What I did:
Having struggled with the oil based inks, I started off today by trying out some watercolour techniques I had read about which sounded interesting.I wanted to use the school press so I kept my work small. I used a piece of clear transparent plastic from a cheap picture frame that was slightly smaller than A5 sized. I drew onto this using neocolour water soluble crayons, taking a postcard of Paul Klee's 'The Golden Fish' as inspiration. I chose this image because it would be relatively simple to draw and contained bold and contrasting colours - its also offered scope for scraping into the layer of crayon as well as drawing directly as there are areas that appear to have been scraped back by the artist.
I drew the goldfish and then surrounded it with a layer of very dark blue. I scratched into this blue layer using a toothpick.
I printed this on to Strathmore 280gsm printmaking paper which I had soaked for a couple of minutes in cold water and then blotted dry. I decided on the correct pressure for the press by passing a blank plate through with the same paper. The pressure was enough to make a pleasing plate mark in the paper but not so much that it made the handle difficult to turn.
The first print I pulled from this plate wasn't quite what I had expected. I could clearly see the crayon marks and everything had stayed exactly where it should be. It was clearly a drawn image. I had expected there to be a bit of running and mingling of colours - for it to be a bit more watercolour- like in appearance. The golden fish wasn't as vivid as I would have liked. Despite the fact that the crayon had not dissolved and moved around much it was still very difficult to see my sgrafitto marks from the toothpick. I think It would be necessary to have a very uniform dark background and very definite and somewhat wider white marks for them to be visible on the print.
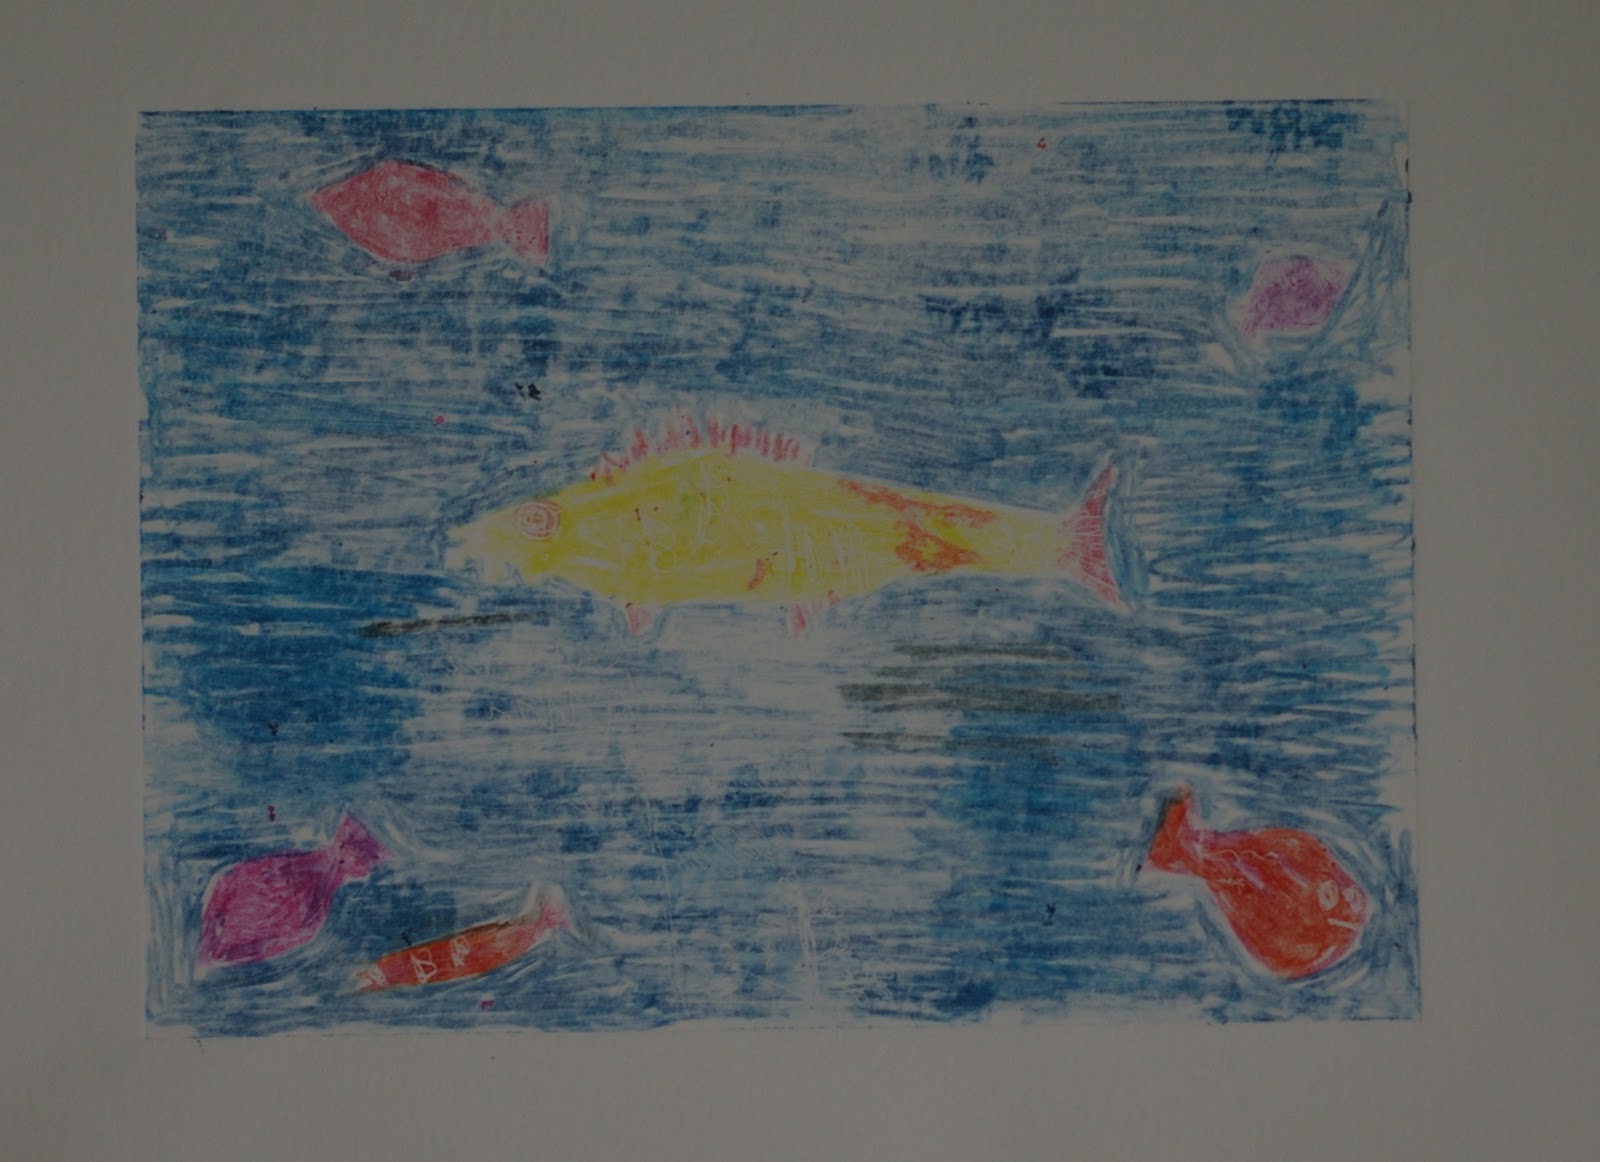 |
| Print made using water soluble crayons on perspex printed onto damp 200gsm Strathmore paper using a press |
There was still a lot of crayon on the plate so I wondered whether I could achieve a more 'painterly' look by printing onto wetter paper. I soaked the same printmaking paper as before but this time I only blotted the back well, leaving the side facing the plate quite wet. This did achieve some marks that were more like painted watercolour in appearance and the yellow of the fish did transfer more boldly than in the previous print. However, it was clear that the paper was not evenly wetted as the crayon ran in some places and printed as drawn crayon marks in other areas. Where the paper was very wetted, the wet neocolour had bled out past the edge of the plate making unintended blue marks.
 |
| Second print made from the same plate as above using wet 200gsm Strathmore paper and a press |
Another technique I had heard of was to paint on a plate using watercolour and print onto wet paper after allowing it to dry. This was not as easy as it sounded. Perhaps predictably, it was really quite impossible to paint with watercolour onto my plastic plate - it just separated into beads much like it would over an area of wax resist. I put more and more of the paint on until it formed more of a pool. I then drew into the paint using neocolour crayons and water soluble coloured pencils. I based the design on a sketch in an old sketchbook of vineyards in winter with hills in the distance. I used a hair dyer to rapidly dry the watercolour and them printed onto soaked and blotted 280gsm printmaking paper as before. The result was not unattractive with the combination of painted areas and drawn lines. It was however a bit thin and pale so lacked great visual impact.
 |
| Print made using watercolour paint and water soluble crayons and pencils on perspex printed onto damp 200gsm Strathmore paper using a press |
I decided to base further monoprints on other sketches in my sketchbook. I used black water-based block printing ink (Schminke lino-printing ink) which I did not dilute or extend. This meant I was forced to work very quickly before the ink dried. I did a quick figure study based on a gesture drawing by Rodin. One problem that I encountered was that, having used and cleaned the plate several times, I had left a couple of greasy fingerprints on the plastic. The water-based ink refused to cover these and they can clearly be seen on the resulting print. I printed this onto the coated paper - I had been unimpressed with my hand pulled lino cut print on this paper with this ink and wanted to see how it would print when put through the press. It was better than when hand pulled but it made some strange marks around the figure where I had painted what had appeared to be a fairly uniform area of ink.
 |
| Print made after Rodin using Schminke water-based lino printing ink on perspex printed onto coated paper using a press |
I re-inked this plate in a similar way and re-printed it onto 53gsm Botan paper from a trial pack of Japanese papers. The face was not so clear on this print but I particularly liked the way they the brush marks in the dark area showed up well.
 |
| Print made using the same plate and ink as above but printed onto 53gsm Botan paper |
On the other half of this piece of paper I made another print based on a sketch I made at the american war cemetery at Cassino. I used the same water-based ink and achieved a similar result with nice brush marks visible because of the texture of the paper. I will use this paper again
 |
| Print made using Schminke water-based lino printing ink on perspex printed onto 53gsm Botan paper using a press |
I then attempted to paint the plate into rough approximation of a landscape based on the one I had tried in watercolours earlier. Once again I painted onto the plate with unadulterated lino-printing ink. Although thinner than the oil-based ink it is still quite thick so there were a lot of dry brush marks on the resulting print which was pulled onto 62gsm pure silk white paper. The best area of this print was the dry brush effect giving an impression of distant rocky mountains. This could be further developed if printed in multiple layers.
 |
| Print made using Schminke water-based lino printing ink on perspex printed onto 62gsm pure silk white paper using a press |
Finally after washing and drying the plate I rolled a layer of the Schminke water based ink over the plate. I had problems again with greasy fingers which made obtaining an even layer very difficult. I drew a partially abstracted figure form into this ink layer with the wooden handle of a paintbrush and with toothpicks and a lolly stick. I then wiped around the figure with tissue leaving smears and streaks of ink. I printed this onto 51gsm Sekishu paper. I like this print but I would have preferred it to be darker. I want to try this reductive technique again using the oil based ink.
 |
| Print made by wiping and scraping into a uniform layer of Schminke water-based lino printing ink on perspex printed onto 51gsm Sekishu paper using a press |
 |
| Print made using Schminke water-based lino printing ink on perspex printed onto Canford 150gsm black paper using a press. Lines added using a white pencil. |
What I learnt:
- Water-soluble crayons and pencils have potential for printing given more practice
- Degree of wetting of the paper makes a big difference to outcome
- Paper weight and texture makes a big difference to print results
- Water-based ink can be used without extender or acrylic medium
- Water-based ink can give reasonable coverage and depth of colour when using a press
- I really like using reductive methods of drawing on the plate
Things to do and improve:
- Try out the subtractive method of creating a mono print using oil-based ink
- Try oil-based ink on dampened paper of various types
- Try oil paints and printing medium in place of oil-based ink for monoprints
- Still not paying enough attention when handling paper - dirty finger marks - need to address this
- Still not making an attempt to register the plate and place it relative to the paper - need to work on this
No comments:
Post a Comment